
In the dynamic landscape of modern IT operations, managing and provisioning infrastructure has evolved into an art that demands speed, accuracy, and scalability. Our previous blog focuses on highlighting the advantages of Infrastructure as Code (IaC) tools within startup environments. In this blog, let me take a step further by delving into one of the cutting-edge IaC tools, Terraform, which has played a pivotal role in bringing the concept of “Infrastructure as Code” (IaC) to fruition.
The central aim of this blog is to provide an introductory glimpse into Terraform. It endeavors to reveal the backstory of Terraform, the fundamental mechanisms that drive its functionality, and the insights gained from our nearly year-long experience working with it.
The tale began in 2011 when AWS announced CloudFormation, a service for defining and provisioning AWS infrastructure using code. Just a day later, Mitchell Hashimoto, co-creator of HashiCorp Terraform, shared his admiration for this concept through a Tumblr blog post. He emphasized the need for an open-source, cloud-agnostic solution that could offer consistent workflows across various cloud providers. Mitchell extended an open invitation to anyone willing to tackle this challenge. A few years passed, and the invite remained unanswered. Therefore, in July 2014, he took matters into his own hands, and thus, Terraform 0.1 came into being.
Now, this naturally raises the question: What exactly is Terraform?
Terraform is a cloud-agnostic Infrastructure as Code (IaC) solution. It empowers us to define, manage, and deploy resources seamlessly, whether they are in the cloud or on-premises, using easily understandable configuration files. These configuration files possess the added benefits of reusability, shareability, and version control, enhancing their adaptability. Below is one such configuration file to create an S3 bucket in the AWS account using Terraform.
provider "aws" {
  access_key = "${var.aws_access_key}"
  secret_key = "${var.aws_secret_key}"
  region = "${var.aws_region}"
}

resource "aws_s3_bucket" "onebucket" {
   bucket = "testing-s3-with-terraform"
   acl = "private"
   versioning {
      enabled = true
   }
   tags = {
     Name = "Bucket1"
     Environment = "Test"
   }
}
And there you have it! The above-mentioned code is all that’s required to create an S3 bucket within your AWS account (assuming you’ve supplied the necessary credentials). We will understand the components of this configuration file in the later part of the blog. Now, let’s take a closer look at How Terraform Operates.
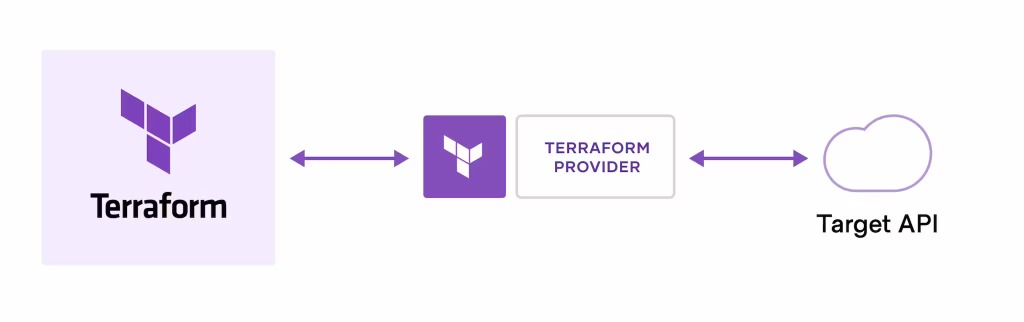
Terraform Providers are a crucial component of Terraform’s functionality. They enable Terraform to seamlessly interact with a wide range of platforms and services that offer accessible APIs. These providers empower Terraform to orchestrate the creation and management of your resources on various cloud platforms and services, leveraging their APIs. The Terraform community boasts thousands of available providers, making it exceptionally convenient for developers to create and manage diverse resources across different platforms. In the above example, we are using the aws_s3_bucket resource in the aws provider to create a S3 bucket.
Terraform processes the configuration file and delegates the responsibility of making API calls to the specified provider for the target service or platform.
With our basic configuration file of creating an S3 bucket ready, let’s explore the fundamental Terraform workflow and how to implement infrastructure modifications.
The core Terraform workflow consists of three stages:
Stage – 1: Write
The user defines resources, which may be across multiple cloud providers and services. For example, in the above-mentioned configuration file, we are creating a S3 bucket. In our case, the file consists of basically two parts:
- Provider: In the first block, we are utilizing the Terraform AWS provider, wherein we’ve specified the credentials and the region of our AWS account. These settings determine the context in which we intend to create the bucket.
- Resource: Within this block, we specify the creation of an S3 bucket using the
aws_s3_bucketresource type, along with additional details such as the bucket’s name, versioning settings, tags, and more
Stage – 2: Plan
Terraform generates an execution plan that outlines the changes it will make to the infrastructure, including creation, updates, or deletions, based on your configuration and the existing infrastructure. To view this plan, you can use the terraform plan command. In the case of our example, the plan step would yield the following result:
➜  terraform plan

Terraform used the selected providers to generate the following execution plan. Resource actions are indicated with the following symbols:
  + create

Terraform will perform the following actions:

  # aws_s3_bucket.onebucket will be created
  + resource "aws_s3_bucket" "onebucket" {
      + acceleration_status         = (known after apply)
      + acl                         = "private"
      + arn                         = (known after apply)
      + bucket                      = "testing-s3-with-terraform"
      + bucket_domain_name          = (known after apply)
      + force_destroy               = false
      ...
    }

Plan: 1 to add, 0 to change, 0 to destroy.

─────────────────────────────────────────────────────────────────────────────────────────────────────────────────────────────────────────────────────────────────────────────────────────────────────────────────────

Note: You didn't use the -out option to save this plan, so Terraform can't guarantee to take exactly these actions if you run "terraform apply" now.
Stage – 3: Apply
Terraform applies the infrastructure changes, post the approval from the user. It also ensures that the proposed operations are in the correct order, respecting any resource dependencies. To initiate this process, simply use the terraform apply command. In our example, running the same will produce the following outcome and the S3 bucket will be generated.
➜  terraform apply

Terraform used the selected providers to generate the following execution plan. Resource actions are indicated with the following symbols:
  + create

...

Do you want to perform these actions?
  Terraform will perform the actions described above.
  Only 'yes' will be accepted to approve.

  Enter a value: yes

aws_s3_bucket.onebucket: Creating...
aws_s3_bucket.onebucket: Creation complete after 8s [id=testing-s3-with-terraform]

...

Apply complete! Resources: 1 added, 0 changed, 0 destroyed.
In brief, all the three stages of core Terraform workflow can be summarized as:

With a fundamental grasp of Terraform and how it operates, let’s now delve into the learnings we’ve gathered through nearly a year of hands-on experience with the tool.
Over this period, Terraform has been an integral part of our infrastructure management, encompassing both our own infrastructure and that of our customers. Our utilization of Terraform has evolved through multiple iterations spanning several months. In light of our experiences, we’ve compiled a list of key learnings and benefits of Terraform that we believe can be valuable for others embarking on their own Terraform journey.
Terraform Directory Structure
Organizing your Terraform directory or repository is a critical consideration, especially when you’re working as a team of engineers who frequently interact with and contribute to your Terraform codebase. During the early stages of development at Kapstan, we opted to maintain distinct main configuration files for Terraform, one for the development cluster and another for the production cluster. This approach served us well at the time, given our relatively small team, as having separate files for each environment facilitated experimentation and testing of various approaches in the development phase. The directory structure resembled the following:
tf
├── argo
│   └── main.tf
├── eks-charts
│   └── main.tf
├── environments
│   ├── development
│   │   ├── main.tf
│   │   ├── output.tf
│   │   ├── provider.tf
│   │   └── variables.tf
│   └── production
│       ├── main.tf
│       ├── output.tf
│       ├── provider.tf
│       └── variables.tf
├── helm
│   ├── main.tf
│   └── variables.tf
└── karpenter
    └── main.tf
However, as the team expanded and more feature requirements surfaced, we noticed an uptick in changes made to the Terraform repository. The existing structure introduced code duplication into the repository because the main configuration file (main.tf) contained nearly identical code for both the development and production environments. Over time, as the team continued to grow, this became a source of frustration and didn’t align with best coding practices.
The solution to this challenge is rooted in Terraform’s best practices. Since the primary difference between our development and production code was confined to the configuration (i.e. Terraform variables), we opted to adopt a new structure. In this updated repository structure, all environments share most configuration files, while variables remain distinct. Below, you’ll find a representation of our revised repository structure.
tf
├── argo
│   └── main.tf
├── eks-charts
│   └── main.tf
├── environments
│   ├── development.tfvars
│   └── production.tfvars
├── helm
│   ├── main.tf
│   └── variables.tf
├── karpenter
│   └── main.tf
├── main.tf
├── output.tf
└── provider.tf
Use Terraform to manage third-party services
When discussing Terraform, the focus often centers around its capabilities for managing resources in both cloud and on-premises environments. However, beyond these core features, Terraform offers an excellent means to interact with third-party services you may rely on. A prime illustration of this versatility is the management of Auth0 accounts using Terraform.
Auth0 is widely utilized in the industry, renowned for its robust authorization features. At Kapstan, we employ Auth0 to oversee the authorization aspects of various entities. Our usage extends to managing multiple roles, users, and various available configurations. To facilitate this, you can harness the Terraform Auth0 provider to interact seamlessly with the Auth0 Management APIs.
Modularization
Over the past year, we’ve come to appreciate that Terraform Modules offer more benefits than initially meet the eye. They serve as the primary means to package and reuse resource configurations within Terraform. In essence, a module is a collection of .tf or .tf.json files conveniently organized within a directory. What’s particularly powerful is that a Terraform module can call upon other modules to incorporate the resources they define.
In our workflow, we’ve heavily relied on Terraform’s public modules to streamline the creation and management of resources within our AWS accounts. Terraform offers a wealth of publicly available modules, which greatly simplifies the management of our cloud resources without the need to start from scratch. To illustrate, consider the example below, where we demonstrate how to create an AWS SQS queue using these modules.
module "sqs" {
  source                            = "terraform-aws-modules/sqs/aws"
  content_based_deduplication       = false
  name                              = var.sns_topic_name
  delay_seconds                     = 0
  fifo_queue                        = false
  kms_data_key_reuse_period_seconds = 300
  max_message_size                  = 262144
  message_retention_seconds         = 345600
  receive_wait_time_seconds         = 0
  sqs_managed_sse_enabled           = true
  visibility_timeout_seconds        = 30
  tags                              = local.tags
}
In addition to leveraging public Terraform modules, you also have the flexibility to organize your code into distinct modules that can be strategically positioned for reuse across your entire repository. This represents one of Terraform’s standout features, bringing the Infrastructure as Code (IaC) concept of code reusability to the forefront. Following a similar approach, you have the opportunity to explore various other public modules and seamlessly incorporate them into your code, sparing you the effort of starting from scratch.
That wraps up our brief overview of Terraform and the insights we’ve gathered from nearly a year of hands-on experience with it. In our next blog post, we will delve into the recent changes introduced in the HashiCorp Products License and their impact on the Terraform Community.
To begin your Terraform journey with your existing infrastructure, consider exploring Kapstan’s One-Click Terraform tool. This tool empowers you to generate Terraform templates directly from your AWS account. For additional information about this tool, please visit our blog.
At Kapstan, we’ve achieved successful deployment and management of both our own infrastructure and our customers’ infrastructure using Terraform. This decision has not only allowed us to expand our engineering team without any disruptions but has also enabled new engineers to become productive right away. By embracing the DevOps mindset and adopting the appropriate Infrastructure as Code (IaC) tools, SaaS businesses can effectively navigate the growth phase while ensuring the seamless and efficient management of their infrastructure. We are building Kapstan so that you don’t have to worry about Infrastructure and Application deployment nightmares. If you’re interested in elevating your DevSecOps and IaC practices to the next level with Kapstan, or if you have any questions, please don’t hesitate to contact us at hi@kapstan.io for early access and more information.
